


AUXILIARY LIGHT INSTALLATION GUIDE - TESLA MODEL 3 (2019 - )
Product Faq
HOW TO INSTALL AUXILIARY LIGHT IN MODEL 3 TESLA?
- STEP BY STEP GUIDE -
As electric cars become more common and the demand for additional lights increases, cars, we decided to write a step-by-step guide on installing an additional light on a Tesla Model 3 (year 2019 ->). This guide is based on a pre-assembled set, which you can find here:: Additional light set Tesla Model 3 (2019 - ).
NOTE! In the Highland model, the OBD adapter is installed in a slightly different location. Watch the video on the product page: Tesla Model 3 Highland OBD adapter.
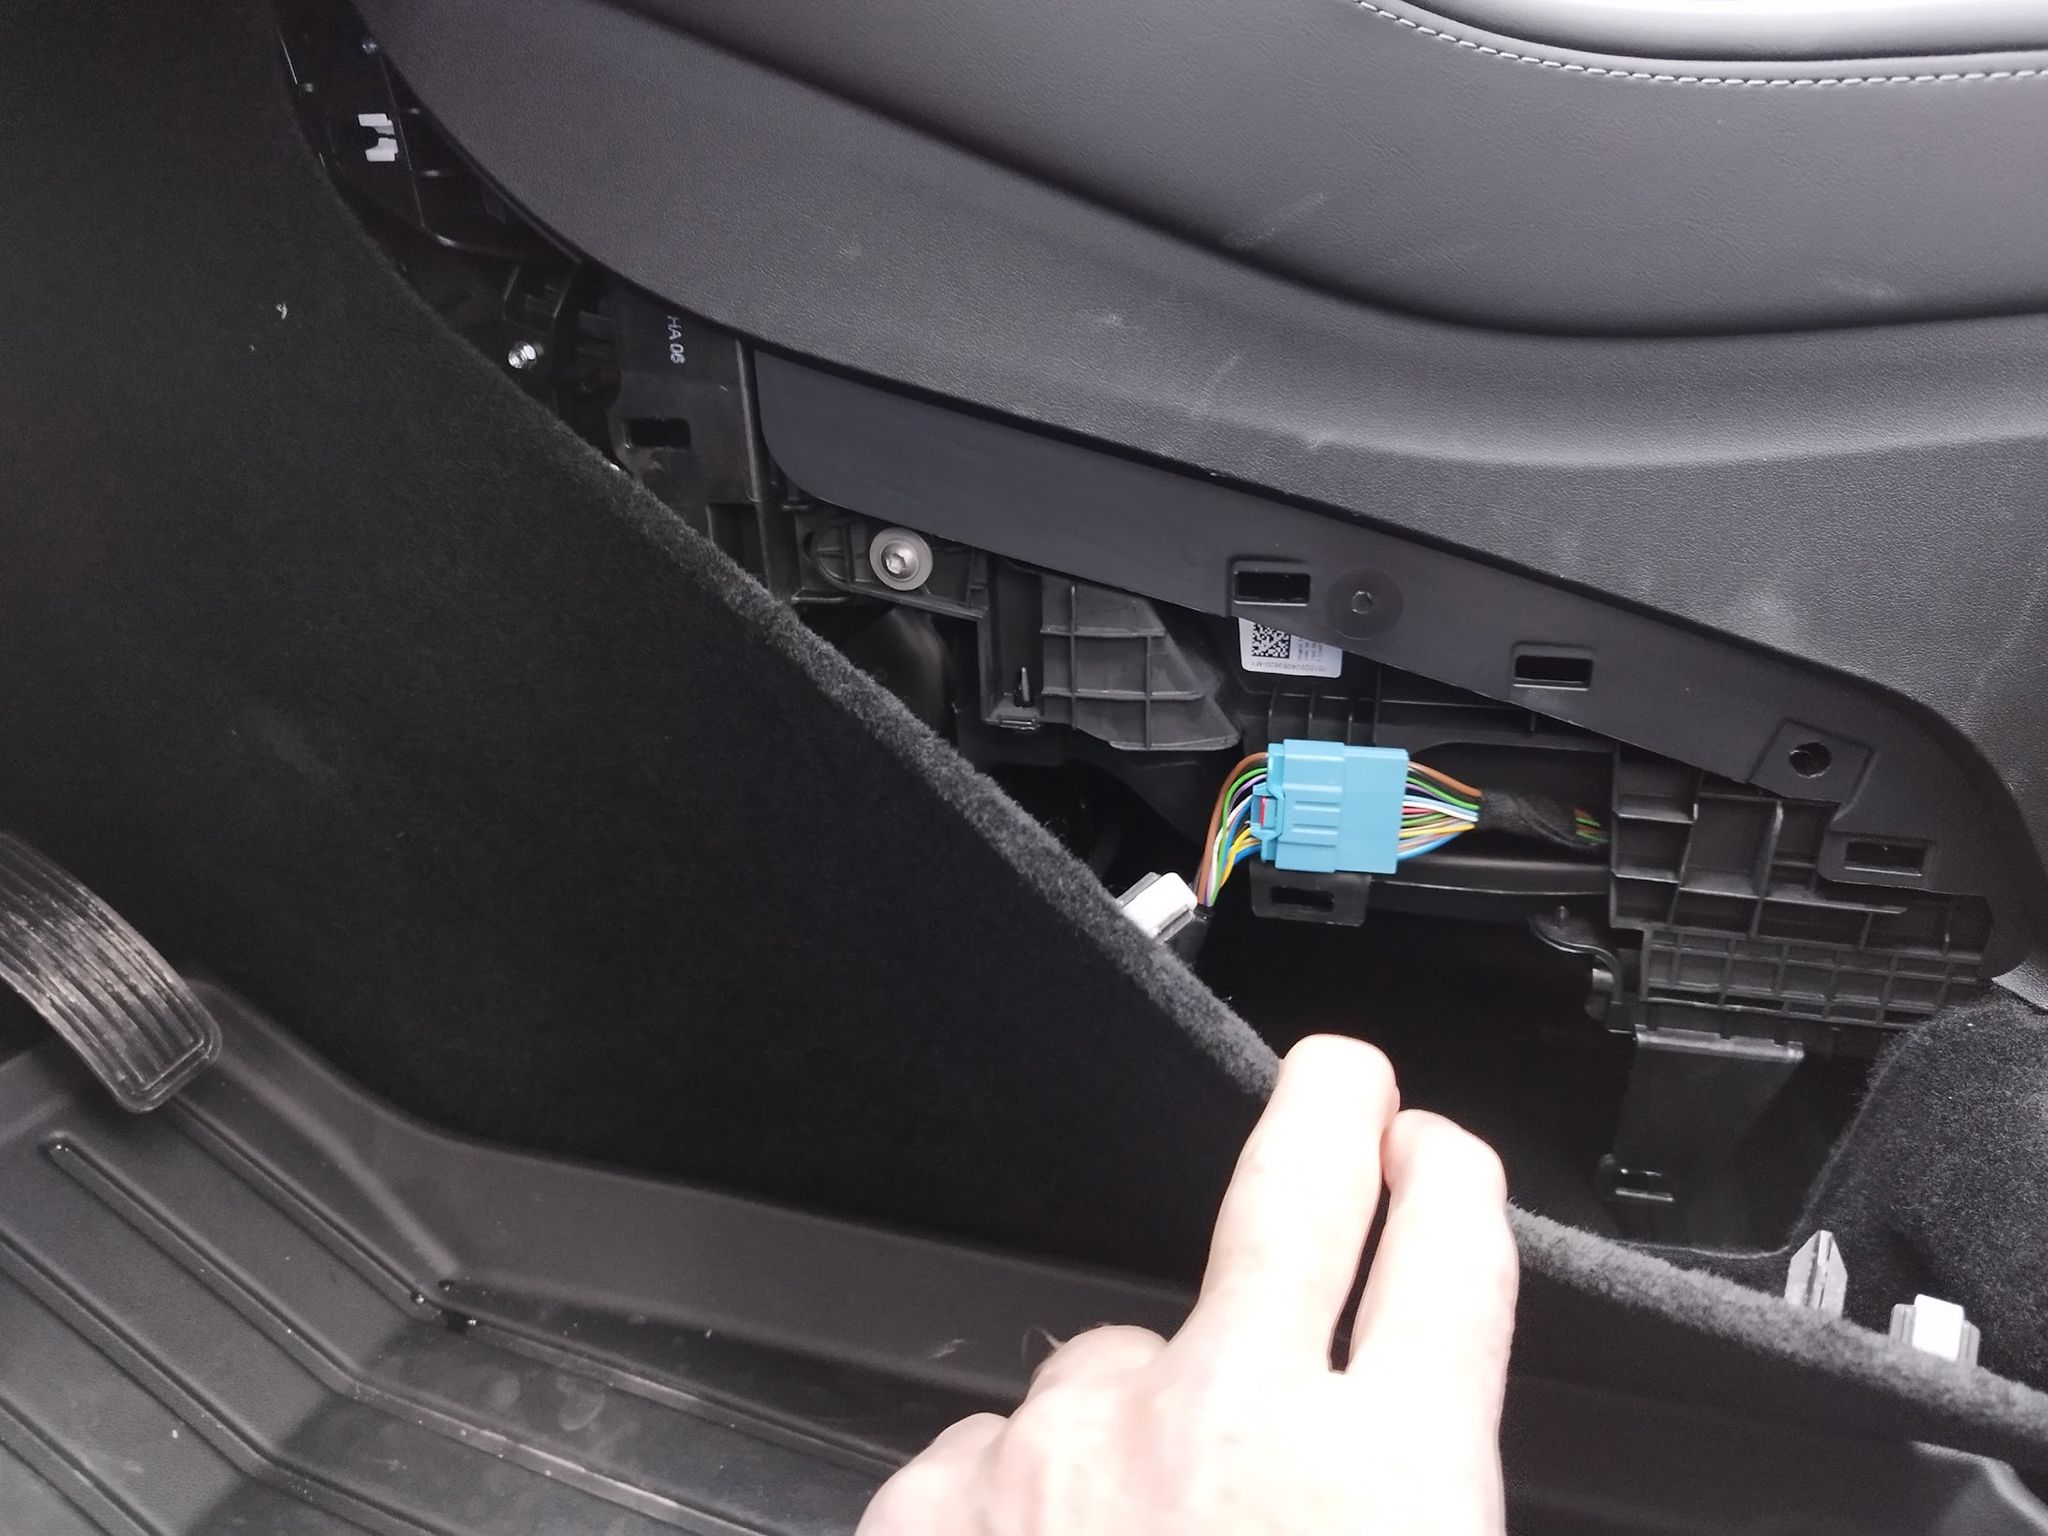
NOTE2! In the 2024 and newer Model 3, the OBD adapter is installed in the driver's footwell, in the socket located by the right foot (see image at the bottom of the page).
The set includes:
- Additional light Purelux Panther Aero S540 or Purelux Road Curve C530 Slim
- Additional light stand Purelux Single bracket kit, Tesla Model 3
- Relay wiring kit Purelux Pro Serie 12V, DT-2 (1 output)
- Connection relay for additional lights XBB OBD Dongle & PowerUnit
- OBD adapter Tesla Model 3
- Pipe connector Purelux Heat Shrink Connector, 2 pcs
- Abico connector, 2 pcs
In addition, it is good to reserve a few basic tools and accessories for the installation:
- Drilling machine
- Ratchet and socket set
- Screwdriver and bit set
- Peeling pliers
- Side cutters
- Hot air blower
- Carpet knife
- Self-drilling screws
- Ties
- Electrical tape
NOTE! The manufacturer guides that in 2017-2023 Model 3 and Model Y models, power for all external accessories (including auxiliary lights) be branched from the power cord of the 12V power outlet (cigarette lighter) found in the center console. This can handle a total of 12A continuous and 16A instantaneous power (144W and 192W).
Below is written step by step how to do the installation.
1. REMOVING THE PARTS
Start the installation by removing the license plate and the backing plate behind it. The license plate is attached with two screws and the back plate comes off by opening the two bolts on it. Once the backing plate is removed, clean the paint underneath. After that, open the hood and remove the service covers from both the back and the front of the front trunk. Both maintenance covers are attached with clips, and they come off simply by lifting them. When the maintenance cover in front of the front trunk has been removed, remove the connector from the emergency release button attached to it using a small flat-head chisel, etc. using as an aid. After that, you can remove the front trunk by opening the seven bolts attached to it, and once the bolts are loosened, lift the front trunk up to its edges so that it also comes off its mounting clips. After this, the entire front trunk should be completely removed by lifting.
2. PREPARATION OF WIRING HARNESS
Take the wiring harness out of its package and open it completely. Locate the fuse box in the wiring harness and pull out the fuse underneath. Also remove the 4-pole relay attached to the relay base. If you also want the parking light in the auxiliary light to work, then the wiring harness must be modified a little: open the insulating sock of the relay base with a carpet knife until the wires underneath it come out. Take a chisel etc. tool and push the blue wire on the relay base out of its place and move its place to the center of the relay base. Once this is done, re-protect the relay base wires with electrical tape. You don't have to do the part in bold text if you don't want the auxiliary light parking light to work. Locate the grounding point and power outlet on the car, and fit the power and ground wires of the wiring harness to these points. If the wires are not long enough, if necessary , cut the insulation sock shorter around the power and ground wires. After this, you can also, if you wish, cut open the ring connectors of the power and ground wires to make the connection easier.
3. WIRING HARNESS CONNECTION
Move the relay base to its final location, and at the same time move the power and ground wires closer to their connection points. Open the bolt of the grounding point, insert the ring connector of the ground wire and tighten the bolt back. Do the same procedure for the power cord, but of course connect it to the power outlet. Note! You don't have to use the bolts completely if you cut open the ends of the ring connectors of the power and ground wires!
4. DISCONNECTING THE MAIN POWER
When the ground and power wires of the wiring harness have been connected, the car's main power is cut off: close the hood, open the driver's side windshield fully and close the front door behind you. Also open at least one of the back doors so that you can connect the OBD adapter when the car is off (the back door must not be closed). Turn off the main power from the window by reaching out from the car's touch screen and go to Controls -> Safety -> Power Off. We also recommend disabling the car's Sentry Mode either via the Tesla mobile app or the car's touch screen (Controls -> Security -> Sentry Mode = Off) before turning off the main power. Stay near the car and wait until you hear the relay "click" to indicate that the power has been cut (this can take up to 15 min). Also make sure that there is no more whirring noise from the car before proceeding to the next step.
5. CONNECTING THE OBD ADAPTER AND XBB DONGL
In the rear footwell of the car, remove the protective cover of the OBD port (located behind the center armrest) using a thin plastic tool, etc. with the aid of a tool. The cover is closed with a total of 5 clips, which come off by carefully pulling/slitting the door. Behind the cover, a bundle of wires is exposed, with a connector in between. Disconnect this connector and place the OBD adapter between the connectors. Insert the XBB Dongle into a free OBD-II port from the adpater. Make sure that all the connections close properly. After this step, you can turn the power back on if you wish (the power will be turned back on anyway when the hood is opened from the Tesla mobile application at the beginning of the next step).
6. CONNECTIONS CONTINUE
Open the hood via the Tesla mobile app (the currents will come back on), and put the fuse back in the fuse box. Also place the XBB PowerUnit relay in the relay base of the relay wiring harness. Make sure the fuse and relay close properly.
7. XBB Configurator Mobile App
Download the mobile app called XBB Configurator from the app store (available on both the App Store and Google Play). Open the application, and create credentials for the application. When the credentials have been created, press "SEARCH FOR XBB DEVICE" in the application, and when the application finds the XBB Dongle installed in your car, press its icon. When the screen shows the "CHOOSE RECIPE" button, press it and you can choose the make and model of the car. Naturally, choose Tesla as the brand and Model 3 as the model. After that, a view opens showing all the channels that the XBB Dongle can read through the car's OBD port. Press the "XBB PowerUnit" button in the lower right corner of the application, through which you can select the channels that you want to control with the XBB PowerUnit relay. Press the "Settings" button, and select "HIGHBEAM" for output 1 and either "POSLIGHT" or "HALO" for output 2. Output 1 controls the additional light and output 2 the parking light of the additional light. If "POSLIGHT" is selected for output 2, the parking light of the additional light comes on at the same time as the car's own parking lights. And if you select "HALO" for output 2, then the additional light's parking light lights up at the same time as the so-called With "Signature Lights".
8. MAKE SURE THE CONNECTIONS WORK
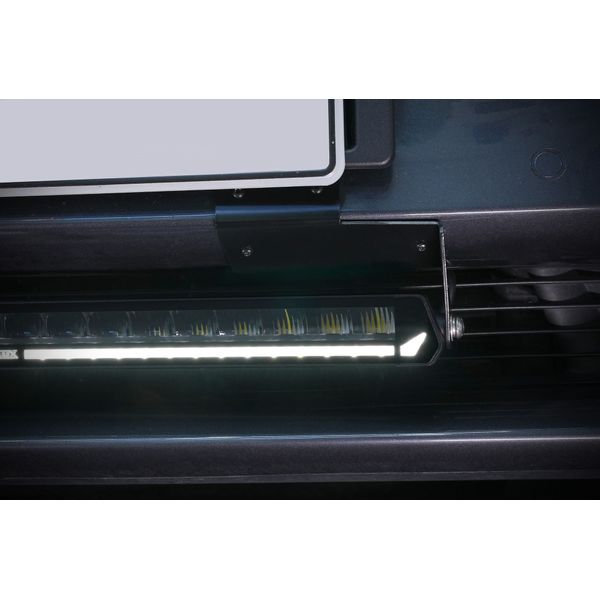
Connect the connector on the auxiliary light to the connector of the wiring harness, and turn on the car's high beams. In this case, the additional light should also light up. If you modified the wiring harness, also make sure the parking light works: connect the white wire at the end of the light connector (the parking light lights up white) or the yellow wire (the parking light lights up orange) to the blue wire of the wiring harness, when the car's own parking lights or so-called The "Signature lights" are on (the parking light is triggered by the previously selected setting for output 2). Note! For example, if you have selected "HALO" for output 2, and you test the functionality of the parking light of the additional light by turning on the car's own parking lights, then the parking light will not light up, because the trigger will not come from the right place. So make sure that the stimulus comes from the place you want!
9. ATTACHING THE RACK
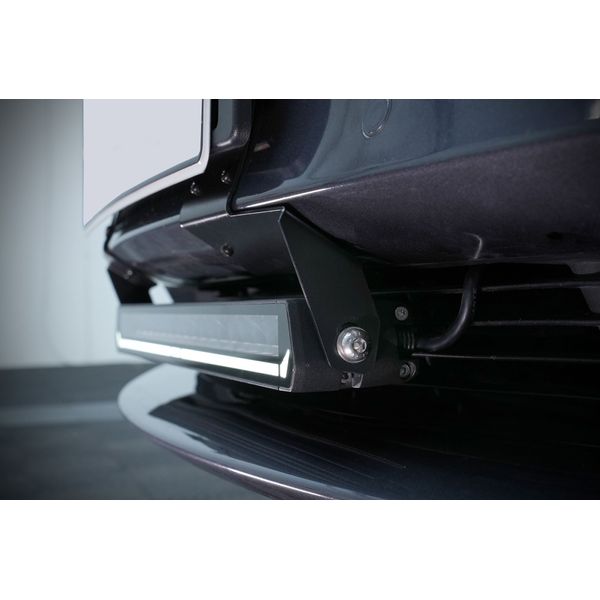
Bolt the brand- and model-specific Additional light holder that comes with the set to the light, and mold the holder and light to the bumper so that the light comes in the middle of the bumper. This is where you should have a friend help you hold the stand in place while you measure and mold the stand into place yourself. You can easily get the light in the middle, for example, by measuring the distance from the parking sensors in the front bumper to the edge of the rack on both sides. When the additional light has been dimensioned in the middle of the bumper, screw the bracket to the bumper using self-drilling screws and a drill. Post-tighten the screwed screws by hand with a chisel. The stand has a total of 12 attachment points, 6 on each side.
10. PUTTING THE POWER CABLE THROUGH AND CLEANING THE CONNECTIONS
Locate a suitable slot for passing the power cable of the additional light on the side of the front trunk. Use, for example, a headlamp as an aid, with which you shine light from the front of the car with one hand, while you look for a suitable gap on the side of the front trunk with the other hand. When the light of the headlamp flashes on the side of the front trunk from a place you have cut with your hand, a suitable place for the passage has been found. Take the power cable through the top grill of the air intake at the bottom of the car's bumper to the gap you found and bring the power cable to the front trunk of the car. After that, take the relay to a place where it is firmly wedged in a vertical position. Neat and bundle the rest of the wiring harness with cable ties, and finally connect the auxiliary light connector to the wiring harness connector.
11. SWITCHING ON THE PARKING LIGHT
This point requires a modification to the wiring harness. Go directly to the next point if you don't want to switch the parking light of the additional light to work. Start connecting the parking light by inserting the tube connector ( Purelux Heat Shrink Connector ) that comes with the set to the base of either the white or yellow wire. So, at this stage, choose which color parking light you want to connect to work (white wire = white parking light / yellow wire = orange parking light). After that, twist the parking light wire (white or yellow) to one of the blue wires coming from the wiring harness. Slide the pipe connector from the base of the parking light wire onto the connection and press the connector from the middle to the outside. Seal the connection with e.g. a hot air blower, and finally protect the auxiliary and parking light connections with electrical tape.
12. FINISHING AND ASSEMBLING
Take the wiring harness bundle in the front trunk, e.g. to the edge of the front trunk, where it won't interfere or get in the way. Also check the current output, the grounding point and the location and position of the relay. If there was a silicone/rubber cover over the power outlet, put it back on the power outlet. When the connections are clear and finished, the plastic parts and covers removed from the car can be fixed back in place. Start by putting the OBD port cover back in place by pressing. Note! The XBB Dongle and the OBD adapter do not fit under the protective cover, but must be taken out of the way, e.g. between the center armrest and the co-driver's seat. Continue by putting the front luggage compartment back in place, and remember to also press the edges back into the retaining clips. Re-bolt the front trunk with the seven bolts removed from it. Reconnect the front trunk emergency release button connector to the service cover removed from the front of the front trunk, and press both this cover and the cover removed from under the windshield back into place. Remember to bolt the back plate back onto the additional light stand and also screw the license plate in place! Finish the job by tightening the bolts of the additional light firmly into the bracket. The final orientation of the additional light has to be done on the road.

Easy and Safe Shopping
You can pay for the order safely and easily with Credit Card, Klarna, Paypal, Google Pay or Apple Pay. Shipping costs starts at only 7.90€. We use UPS and GLS for shipping.
Fast Delivery in 3-7 days (DHL/UPS/GLS)
Products in stock are normally shipped out within 1-2 working days. We process orders continuously and orders placed before 13 are normally sent at the same day. The shipment takes usually 3-7 days in Europe.
100% Satisfaction Guarantee
We want you as a customer to be 100% satisfied with your purchase. That's why we offer 30 days to return the products if you are not happy with it! Safe and carefree shopping at its best!
![]()
THE BIGGEST AND CHEAPEST LIGHT STORE IN THE NORDIC COUNTRIES
Lighting fixtures and their associated accessories are in a constant state of evolution - and so is our product selection. Within the VALOSTORE online shop, you will always discover the most cutting-edge auxiliary lights, headlamps, work lights, and handheld flashlights, along with top-tier accessories available in the market. Valostore boasts its very own light measurement laboratory, ensuring that we provide accurate information regarding the actual luminous output and other performance-related metrics of our fixtures. We warmly invite you to explore the VALOSTORE online shop and indulge in a shopping experience like no other!
VALOSTORE.COM
Handshake Finland Oy
VAT: FI23041120
Alasintie 9, 90400 Oulu
WHAT WE OFFER
- The best brands in the lighting industry
- Satisfaction guarantee
- 30-day right to return
- Safe payment methods
- Fast deliveries
- Free delivery across Europe on orders over 229 €. Free returns on all orders.
- Note: "UPS - Delivery across Europe"


© 2026 Handshake Finland Oy | Privacy statement